Seeing “The uploaded file exceeds the maximum upload size for this site”? This guide shows you how to increase the WordPress maximum upload file size using four different methods.
WordPress has a default limit for file uploads. This limit depends on your hosting configuration. Common limits are 2MB, 8MB, or 32MB. When you try to upload large images, videos, or plugins, you hit this wall. The good news is you can increase it.
Check Your Current Upload Limit
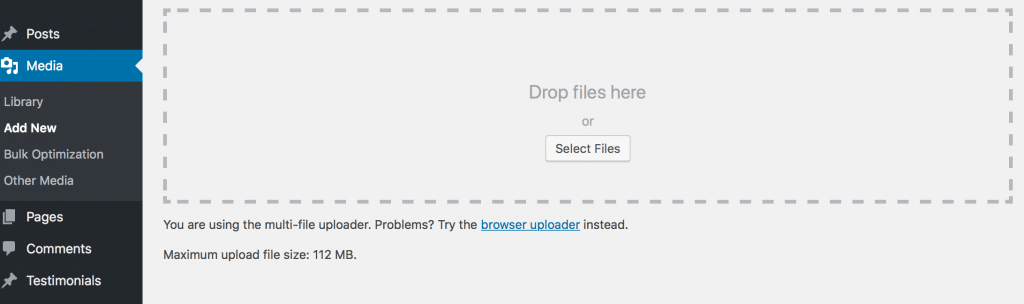
First, find your current maximum upload size. Go to Media > Add New in your WordPress dashboard. Look below the upload area. You will see text like “Maximum upload file size: 8 MB.”
If your limit is too low for your needs, use one of these four methods to increase it.
Method 1: Edit the .htaccess File
The .htaccess file controls server behavior for your site. Many hosts allow PHP settings through this file. This method works on Apache servers, which most shared hosts use.
Access your site files using FTP or your hosting file manager. Find the .htaccess file in your WordPress root directory. It may be hidden, so enable hidden files in your file manager.
Open the file and add this code at the bottom:
php_value upload_max_filesize 64M
php_value post_max_size 64M
php_value max_execution_time 300
php_value max_input_time 300
Save the file and check your upload limit again. You should see the new 64MB limit. Adjust the values as needed for your situation.
What these settings do:
upload_max_filesize– Maximum size of an uploaded filepost_max_size– Maximum size of POST data (should be larger than upload size)max_execution_time– How long PHP scripts can run (in seconds)max_input_time– How long PHP waits for input (in seconds)
If you get an error after adding this code, your host may not allow these directives. Try the next method instead.
Method 2: Edit the php.ini File
The php.ini file controls PHP configuration directly. Some hosts allow you to create or edit this file. Others restrict access for security.
Look for php.ini in your WordPress root directory. If it does not exist, you can create one. Add these lines:
upload_max_filesize = 64M
post_max_size = 64M
max_execution_time = 300
Save the file and test your upload limit. If this does not work, your host may not support custom php.ini files in this location.
Some hosts require the file in a different location. Check your hosting documentation or control panel. Many have a PHP settings section where you can adjust these values through a web interface.
Method 3: Edit the Theme Functions File
You can add code to your theme’s functions.php file to change upload limits. This method works when server-level changes are not allowed.
Go to Appearance > Theme Editor in WordPress. Select your child theme if you have one. Open the functions.php file. Add this code at the bottom:
@ini_set( 'upload_max_size' , '64M' );
@ini_set( 'post_max_size', '64M');
@ini_set( 'max_execution_time', '300' );
Save the file and check your upload limit. This method uses PHP’s ini_set function to change settings at runtime.
Important notes:
- Use a child theme so updates do not erase your changes
- Some hosts disable ini_set for security
- Server limits may still override these settings
This method may not work on all hosts. If it fails, try the other methods or contact your hosting provider.
Method 4: Contact Your Hosting Provider
The easiest solution is often asking your host. Many hosts restrict PHP settings for security. But they can increase limits for you upon request.
Contact your hosting support and explain you need a higher upload limit. They can adjust server settings that you cannot access. Most good hosts handle this quickly.
WPlook Hosting sets a generous 128MB upload limit by default. If you need more, support can help. This removes the hassle of editing configuration files.
Which Method Should You Use?
Try methods in this order:
- .htaccess – Works on most shared hosts with Apache
- php.ini – Works if your host allows custom PHP configuration
- functions.php – Works when server changes are blocked
- Contact host – Always works when other methods fail
After each method, clear your cache and refresh the Media > Add New page to check the new limit.
Alternative: Use a Plugin
If editing files intimidates you, plugins can help. Plugins like “Increase Maximum Upload File Size” provide a settings page to change limits. They use the same methods internally but with a user interface.
The downside is adding another plugin. For a simple settings change, editing files is cleaner. But plugins work for non-technical users.
Upload Large Files Safely
When uploading large files, keep these tips in mind:
- Optimize images first – Compress images before uploading. Large images slow your site.
- Use FTP for huge files – Very large files may timeout during browser upload. FTP is more reliable.
- Check server space – Make sure your hosting has enough storage.
- Consider external hosting – Host videos on YouTube or Vimeo instead of uploading directly.
For image optimization plugins, read our guide on WordPress image optimization.
Troubleshooting Common Issues
Changes not taking effect: Clear your browser cache and any WordPress caching plugins. Try logging out and back in.
Site shows error after editing: You may have syntax errors in your code. Undo your changes or restore from backup. Use FTP if you cannot access WordPress.
Host blocks changes: Some managed hosts lock down PHP settings. Contact support to make changes on your behalf.
Upload still fails: The server may have additional limits. Check if CloudFlare or other CDNs impose size limits. Also verify your PHP memory limit is sufficient.
Frequently Asked Questions
- What is the default WordPress upload limit?WordPress itself does not set limits. Your hosting server configuration determines the limit. Common defaults are 2MB, 8MB, 32MB, or 64MB depending on the host.
- How large can I make the upload limit?Technical limits depend on your server. Shared hosts often cap at 128MB or 256MB. VPS and dedicated servers can go higher. Consider practical needs – most files should not be gigabytes.
- Will increasing upload size slow my site?The setting itself does not slow your site. But uploading large unoptimized files will. Compress images and host videos externally to keep your site fast.
- Why did my limit reset after a theme update?If you added code to functions.php without using a child theme, updates overwrite your changes. Always use a child theme for custom code, or use .htaccess or php.ini methods instead.
- Is 64MB enough for most sites?Yes. 64MB handles large images, PDFs, and most plugin files. Video files may need more, but consider external video hosting instead.
Conclusion
Increasing the WordPress maximum upload file size is straightforward. Edit .htaccess, php.ini, or functions.php with the code provided. If those do not work, contact your hosting provider.
Remember to optimize files before uploading. Large uncompressed images hurt your site speed. Use the right file sizes for the right purposes.
For hassle-free hosting with generous upload limits and great support, check out WPlook Hosting. Learn more WordPress basics in our guide on how to make a website.
If you are a non-technical user, our team can help. Order a small job and we will make these changes for you in less than 24 hours.
Get Hosting WordPress

Get Access to All 29 WordPress Themes
Build unlimited websites with one subscription.