Want a profile picture next to your WordPress comments and posts? Learn how to add a WordPress avatar in 5 easy steps. Your Gravatar follows you across the internet.
When you browse websites, you notice pictures next to user names. These are avatars or Gravatars (Globally Recognized Avatars). Your Gravatar appears automatically wherever you post online. It helps people recognize you across different sites.
Having a Gravatar saves time. Set it up once and it works everywhere. It becomes part of your personal brand online. Let us walk through the setup process.
Step 1: Sign Up at Gravatar.com
Go to Gravatar.com and create an account. Click “Create your own Gravatar” on the homepage.
Gravatar uses WordPress.com accounts. If you have a WordPress.com account, sign in with those credentials. If not, create a new account with your email and password.
The email address you use matters. Gravatar links your picture to this email. Use the same email for WordPress comments to display your avatar.
Step 2: Confirm Your Email Address
Gravatar sends a confirmation email after signup. Check your inbox and click the confirmation link. This verifies you own the email address.
Once confirmed, your Gravatar profile links to that email. Wherever you comment or post using this email, your avatar appears.
You can add multiple email addresses to one Gravatar account. This helps if you use different emails for different sites.
Step 3: Upload Your Avatar Image
Now add your image. Click “Add a new image” in your Gravatar dashboard. Choose how to add the image:
- Upload from computer – Select a file from your device
- Use webcam – Take a photo with your camera
- Import from URL – Link to an image online
Upload a square image for best results. Gravatar displays images at different sizes, so square images look good everywhere. A minimum of 256×256 pixels works well.
After uploading, crop your image if needed. Center on your face or logo. Click “Crop and Finish” when satisfied.
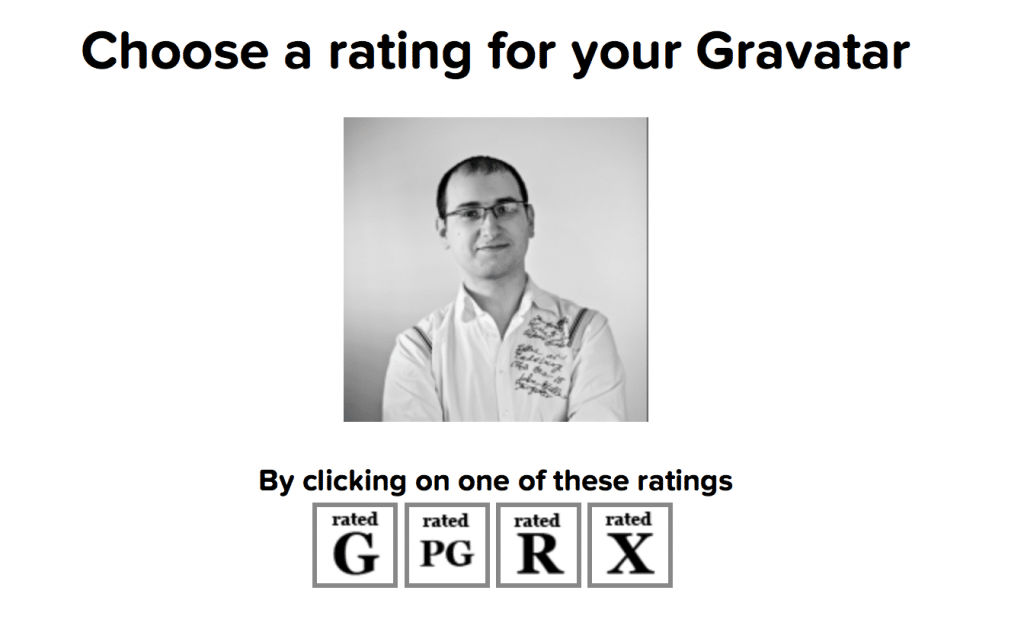
Step 4: Choose an Image Rating
Gravatar uses ratings like movies. This controls where your image can appear. The ratings are:
- G – Suitable for all audiences
- PG – May contain mild content
- R – May contain adult themes
- X – May contain explicit content
Most personal and professional avatars should be rated G. This ensures your image shows on all sites. Sites can choose which ratings to display.

Click your chosen rating to apply it.
Step 5: Save and Test Your Gravatar
Your settings save automatically. Look at the top right of your Gravatar dashboard. You should see your new avatar instead of the default image.
Test it by leaving a comment on a WordPress site. Use the same email address from your Gravatar account. Your avatar should appear next to your comment.
Changes may take a few minutes to propagate. If your avatar does not show, wait and refresh the page.
Adding More Email Addresses
You can link multiple emails to one Gravatar. This way, the same image appears regardless of which email you use.
Go to your Gravatar dashboard and click “Add email address.” Enter the new email and confirm it. Then link it to your avatar image.
Using Different Images
You can have different avatars for different emails. Upload multiple images and assign each to specific email addresses.
This works well if you want a professional photo for work emails and something casual for personal use.
Why Gravatars Matter
Avatars add personality to your online presence. Benefits include:
- Recognition – People remember faces better than names
- Trust – Real photos build credibility
- Branding – Consistent image across platforms
- Engagement – Comments with avatars feel more personal
For bloggers and professionals, a Gravatar is essential. It makes your contributions visible and memorable.
Avatar Tips
Use a clear photo: Choose an image where your face is visible and well-lit. Avoid busy backgrounds.
Keep it professional: For business contexts, use a headshot or logo. Casual photos suit personal blogs.
Update periodically: If your appearance changes significantly, update your avatar to stay recognizable.
Consider square crops: Gravatars display as circles on some sites. Center important elements.
Frequently Asked Questions
Is Gravatar free?
Yes. Gravatar is completely free to use. You can upload images and link unlimited email addresses at no cost.
Where does my Gravatar show?
Gravatars appear on WordPress sites, GitHub, Slack, and many other platforms. Any service that supports Gravatar will display your image.
Why is my avatar not showing?
Check that your email matches exactly. Verify your rating setting allows display. Clear your cache and wait a few minutes for changes to propagate.
Can I use a logo instead of a photo?
Yes. Businesses often use logos as Gravatars. Upload your logo image just like a photo.
Conclusion
Adding a WordPress avatar takes just five steps. Create a Gravatar account, confirm your email, upload an image, set the rating, and save. Your avatar then appears wherever you use that email.
A good avatar builds your online identity. Take time to choose an image that represents you well. For more WordPress basics, read our guide on how to make a website.
Get Hosting WordPress Avatar


Elevate Your Online Presence with Our Free WordPress Themes
Craft Your Debut Blog or Nonprofit Website with Our Complimentary Themes!
Discover Free Themes