
Taking screenshots on a Mac works differently than on Windows. There is no dedicated Print Screen key, but you can print screen on a Mac using powerful built-in shortcuts that capture your entire screen, a specific window, or a custom selection in just a few keystrokes.
This guide covers every method to print screen on a Mac, from quick keyboard shortcuts to the built-in Screenshot app. Whether you’re documenting a bug, saving a receipt, or creating tutorials, you’ll find the right approach for your needs.
Quick Reference: How to Print Screen on a Mac
Before diving into details, here’s a quick reference table for how to print screen on a Mac:
| Shortcut | Action |
|---|---|
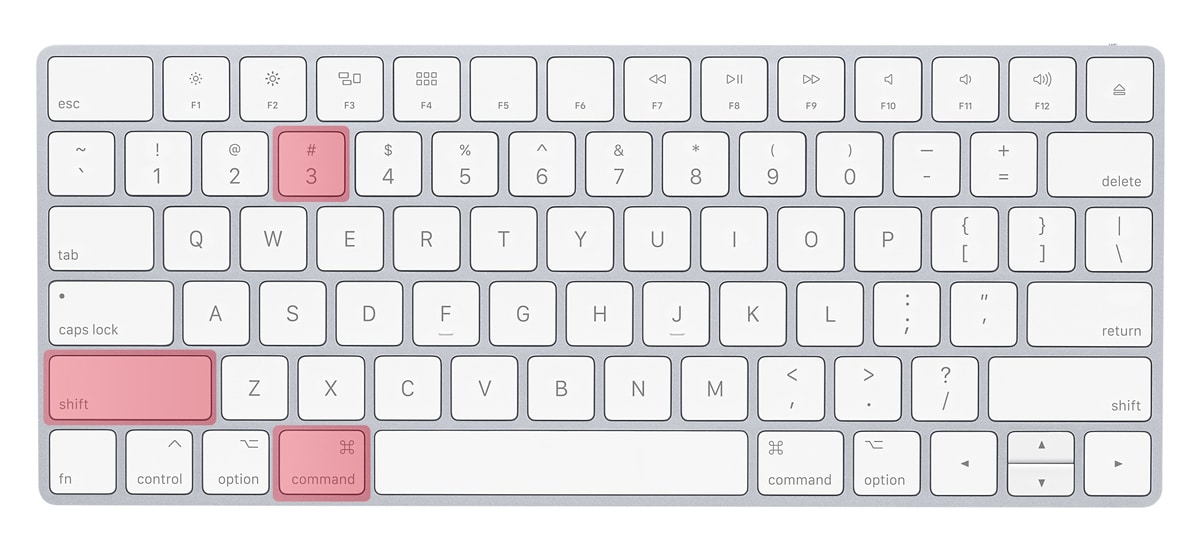
| Command + Shift + 3 | Capture entire screen |
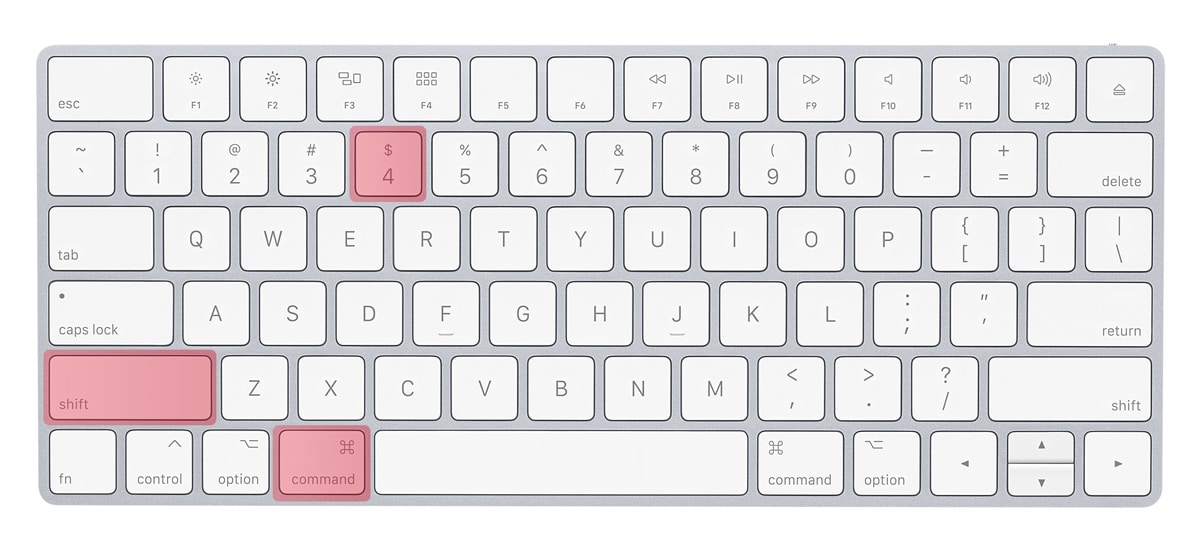
| Command + Shift + 4 | Capture selected area |
| Command + Shift + 4 + Space | Capture specific window |
| Command + Shift + 5 | Open Screenshot toolbar |
| Command + Shift + 6 | Capture Touch Bar (MacBook Pro) |
Add Control to any shortcut to copy the screenshot to your clipboard instead of saving it as a file.
Method 1: Capture the Entire Screen
The simplest way to print screen on a Mac captures everything visible on your display.
Press Command + Shift + 3
Your Mac captures the entire screen instantly. A thumbnail appears briefly in the corner of your screen. Click it to edit the screenshot, or wait for it to disappear and find the file on your desktop.
If you have multiple monitors, this shortcut captures all screens simultaneously, creating separate image files for each display.
Pro tip: Hold Control while pressing this shortcut (Command + Control + Shift + 3) to copy the screenshot to your clipboard instead of saving a file. You can then paste it directly into documents, emails, or image editors.
Method 2: Capture a Selected Area
When you only need part of your screen, use the selection tool for precise captures.
Press Command + Shift + 4
Your cursor transforms into a crosshair with pixel coordinates. Click and drag to select the exact area you want to capture. Release the mouse button to take the screenshot.
While dragging your selection, you can use these modifiers:
- Hold Shift – Lock the selection to horizontal or vertical movement
- Hold Option – Resize the selection from its center
- Hold Space – Move the entire selection without changing its size
- Press Escape – Cancel the screenshot
This method works perfectly for capturing specific content without including unnecessary elements. Web designers and developers using code editors frequently use this for documentation.
Method 3: Capture a Specific Window
Capturing a single window produces clean screenshots with professional-looking drop shadows.
Press Command + Shift + 4, then press Space
Your cursor changes to a camera icon. Move it over any window, menu, or the Dock to highlight it. Click to capture that element with its shadow intact.
This method automatically includes the window’s drop shadow, making screenshots look polished without any editing. To capture without the shadow, hold Option while clicking.
Window captures work on:
- Application windows
- Dialog boxes and alerts
- Menu bar menus
- The Dock
- The desktop (captures wallpaper only)
Method 4: Use the Screenshot App (Command + Shift + 5)
macOS Mojave introduced the Screenshot app, providing a visual toolbar for all capture options. This is the most versatile way to print screen on a Mac.
Press Command + Shift + 5
A floating toolbar appears at the bottom of your screen with these options:
- Capture Entire Screen – Same as Command + Shift + 3
- Capture Selected Window – Same as Command + Shift + 4 + Space
- Capture Selected Portion – Same as Command + Shift + 4
- Record Entire Screen – Create a video of your screen
- Record Selected Portion – Record a specific area
Click Options in the toolbar to access additional settings:
- Save to – Choose desktop, documents, clipboard, mail, messages, or preview
- Timer – Set a 5 or 10-second delay before capture
- Show Floating Thumbnail – Toggle the preview thumbnail
- Remember Last Selection – Reuse your previous selection area
- Show Mouse Pointer – Include or exclude the cursor
The Screenshot app remembers your preferences between sessions, making repeated captures faster.
Method 5: Capture the Touch Bar

MacBook Pro models with a Touch Bar have a dedicated screenshot shortcut for that display.
Press Command + Shift + 6
This captures the current state of your Touch Bar as a wide, narrow image. The screenshot saves to your desktop like other captures.
You can also add a Screenshot button directly to your Touch Bar through System Settings > Keyboard > Touch Bar Settings.
Method 6: Use Preview for Screenshots
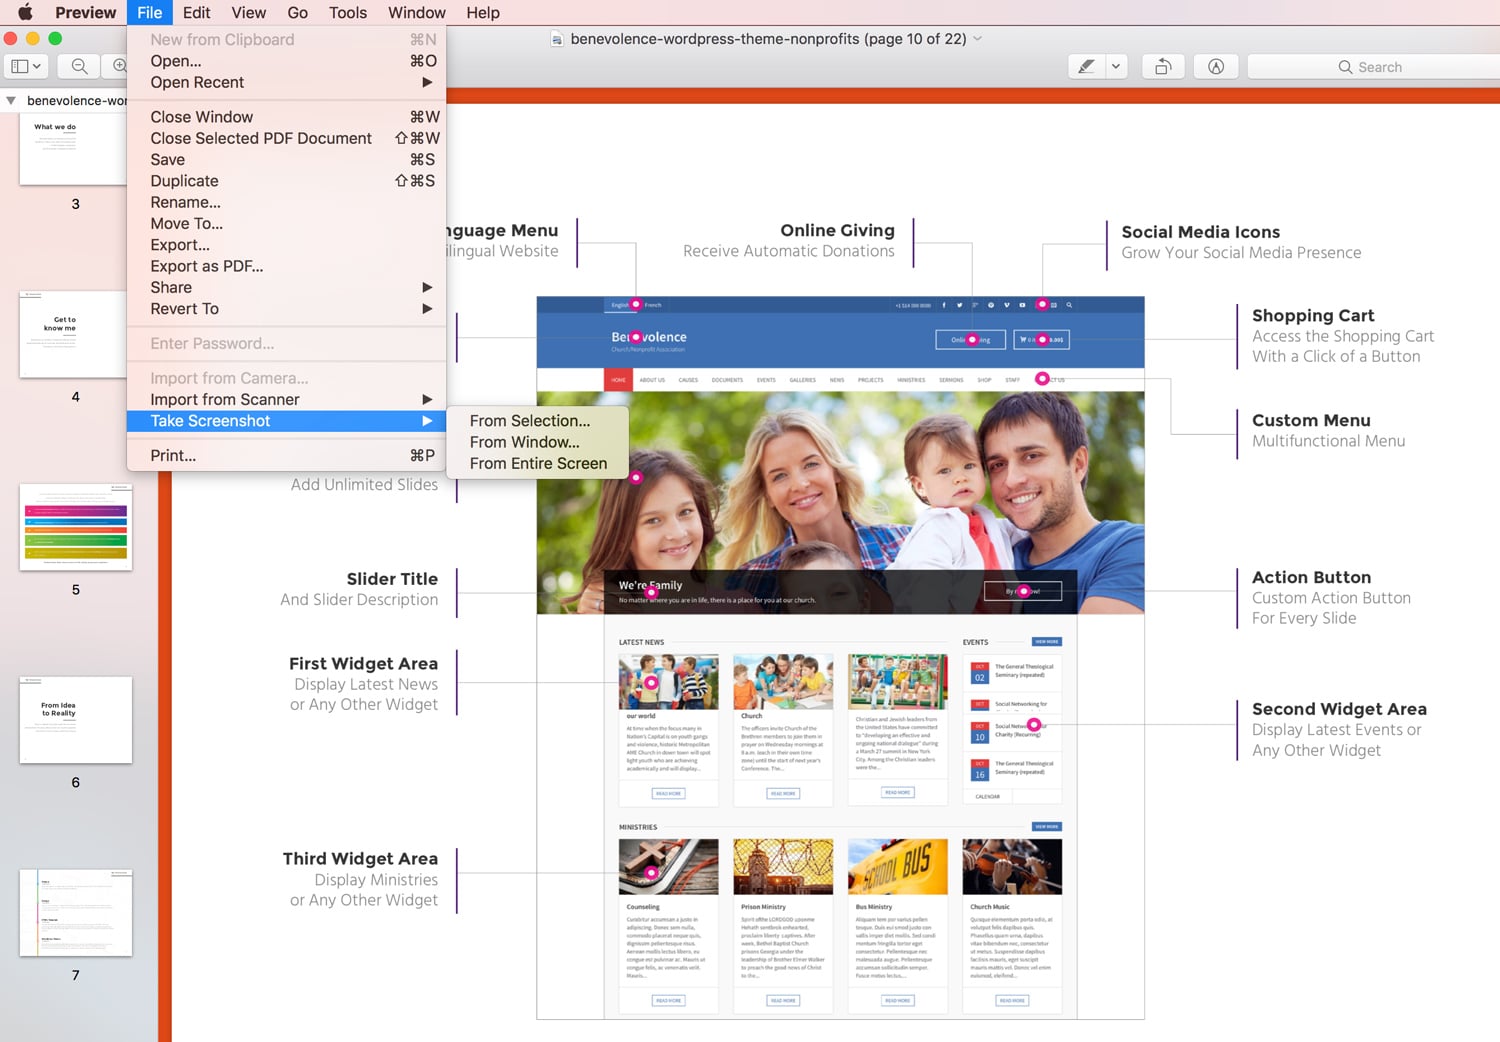 Preview, the built-in image and PDF viewer, includes screenshot capabilities that let you edit immediately after capture.
Open Preview, then go to File > Take Screenshot
You’ll see three options:
- From Selection – Drag to select an area
- From Window – Click a window to capture it
- From Entire Screen – Captures after a short delay
The screenshot opens directly in Preview for editing. You can crop, annotate, adjust colors, and save in various formats including PNG, JPEG, TIFF, and PDF.
This method works well when you need to edit screenshots before saving or sharing them.
Method 7: Copy Screenshots to Clipboard
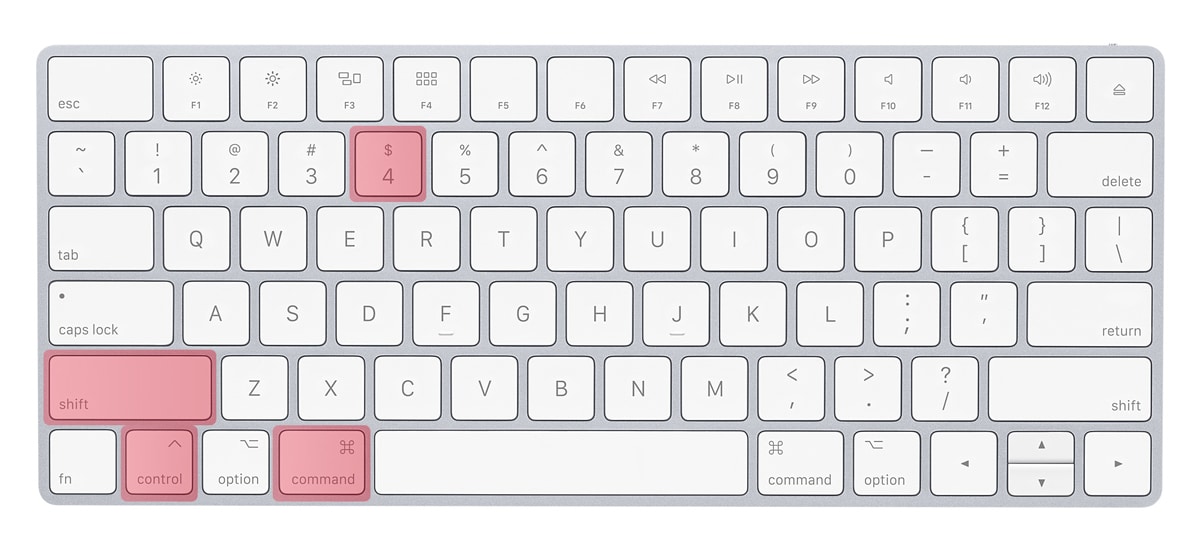
Sometimes you need to paste a screenshot directly into another application without saving a file first.
Add Control to any screenshot shortcut to copy to clipboard instead of saving:
- Command + Control + Shift + 3 – Full screen to clipboard
- Command + Control + Shift + 4 – Selection to clipboard
- Command + Control + Shift + 4 + Space – Window to clipboard
After capturing, press Command + V to paste the screenshot into any application that accepts images. This works in email clients, document editors, photo editing apps, and most other software.
Where Mac Saves Screenshots
By default, macOS saves screenshots to your desktop with names like “Screenshot 2026-02-05 at 10.30.45 AM.png”.
To change the save location:
- Press Command + Shift + 5 to open the Screenshot toolbar
- Click Options
- Under “Save to,” choose your preferred location
Available save locations include Desktop, Documents, Clipboard, Mail, Messages, Preview, or any custom folder through “Other Location.”
Change Screenshot File Format
macOS saves screenshots as PNG files by default. To change this, open Terminal and run:
defaults write com.apple.screencapture type jpgReplace “jpg” with your preferred format: png, pdf, tiff, or gif. After running the command, restart your Mac or log out and back in for the change to take effect.
Disable Screenshot Shadows
Window screenshots include drop shadows by default. To disable them permanently:
defaults write com.apple.screencapture disable-shadow -bool trueRun killall SystemUIServer or restart your Mac to apply the change.
Screenshot Editing on Mac
When you take a screenshot, a thumbnail appears in the bottom-right corner for a few seconds. Click it to open Markup, Apple’s built-in annotation tool.
Markup lets you:
- Draw with pen, pencil, or highlighter tools
- Add shapes like rectangles, circles, arrows, and lines
- Insert text boxes and speech bubbles
- Add signatures using your trackpad or camera
- Crop the image to remove unwanted areas
- Rotate the screenshot
For more advanced editing, professional photo editor apps offer additional features like layers, filters, and precise adjustments.
Third-Party Screenshot Apps
While macOS screenshot tools handle most needs, third-party apps offer additional features:
CleanShot X – Adds scrolling capture, annotation tools, cloud storage, and GIF recording. Popular among developers and content creators.
Snagit – Professional screenshot and screen recording tool with extensive editing capabilities and template libraries.
Shottr – Lightweight, free app with scrolling screenshots, OCR text recognition, and measurement tools.
Skitch – Simple annotation tool from Evernote, focused on quick markup and sharing.
These tools integrate with productivity workflows and offer features like automatic uploads, link sharing, and team collaboration that the built-in tools don’t provide.
Troubleshooting Mac Screenshots
Screenshots Not Working
If keyboard shortcuts don’t capture screenshots:
- Check System Settings > Keyboard > Keyboard Shortcuts > Screenshots to ensure shortcuts are enabled
- Restart your Mac to clear any temporary issues
- Check if another app has overridden these shortcuts
- Try the Screenshot app directly from Applications > Utilities
Screenshots Not Saving
If screenshots aren’t appearing:
- Check your designated save location (use Command + Shift + 5 > Options to verify)
- Ensure you have write permissions for the save folder
- Verify available disk space
- Look in your clipboard if you accidentally added Control to the shortcut
Can’t Screenshot Certain Apps
Some applications block screenshots for security or copyright reasons. Streaming services like Netflix and Disney+ prevent screen capture to protect content. Banking and password manager apps may also restrict captures.
Frequently Asked Questions
- What is the Print Screen button on Mac?Mac keyboards don’t have a Print Screen button like Windows keyboards. Instead, macOS uses keyboard shortcuts: Command + Shift + 3 for full screen, Command + Shift + 4 for selected areas, and Command + Shift + 5 for the screenshot toolbar.
- How do I screenshot on Mac without keyboard?Open the Screenshot app from Applications > Utilities > Screenshot, or search for “Screenshot” using Spotlight (Command + Space). You can also access it through Preview > File > Take Screenshot.
- Where do Mac screenshots go?Screenshots save to your desktop by default. You can change this location using Command + Shift + 5 > Options > Save to, or by running a Terminal command to set a custom folder.
- How do I take a scrolling screenshot on Mac?macOS doesn’t include native scrolling screenshot support. Use third-party apps like CleanShot X, Shottr, or Firefox’s built-in screenshot tool (for web pages) to capture content longer than your screen.
- Can I record my screen instead of taking screenshots?Press Command + Shift + 5 and select either “Record Entire Screen” or “Record Selected Portion.” Click Record to start, then click the Stop button in the menu bar when finished. macOS saves recordings as MOV files. For professional video editing, you’ll want dedicated software.
Related resources: If you work with visual content regularly, check our guides on photo editing apps, video editing software, and audio editing tools to complete your creative toolkit.
Software

Elevate Your Online Presence with Our Free WordPress Themes
Craft Your Debut Blog or Nonprofit Website with Our Complimentary Themes!
Discover Free Themes