Your charity does amazing work. Now you need a website to share it with the world. The good news? Building a website for charity organizations is easier than ever in 2026. You don’t need coding skills or a big budget to get started.
A website helps your charity in many ways. It builds trust with donors. It shares your mission with new supporters. It collects donations around the clock. And it keeps your community informed about your work.
This guide walks you through every step. By the end, you’ll have a professional charity website ready to grow your cause.
Step 1: Define Your Website Goals
Before you build anything, think about what you want your website to do. Clear goals shape every decision you make next.
Most charity websites have these main goals:
- Raise awareness – Tell people about your cause and the problems you solve
- Collect donations – Make it easy for supporters to give money online
- Recruit volunteers – Find people who want to help with their time
- Share updates – Keep donors and supporters informed about your impact
- Build credibility – Show that your organization is trustworthy and legitimate
Write down your top three goals. These will guide your design choices later. A charity focused on donations needs a clear “Donate” button on every page. One focused on volunteers needs a strong signup form.
Step 2: Choose Your Domain Name
Your domain name is your website address. It’s what people type to find you online. Choosing the right one matters more than you might think.
Here are tips for picking a great domain:
- Keep it short – Shorter names are easier to remember and type
- Use your organization name – This builds brand recognition
- Consider .org – The .org extension tells visitors you’re a nonprofit
- Avoid numbers and hyphens – These confuse people when they hear your name
- Check social media – Make sure the name is available on platforms you’ll use
For example, if your charity is “Hope for Children,” try hopforchildren.org first. If that’s taken, try hopeforchildrencharity.org or similar variations.
You can register your domain through WPlook’s domain registration. The process takes just a few minutes. You’ll pick your name, choose your extension, and complete the purchase. Most domains cost between $10-15 per year.
Step 3: Get Reliable Web Hosting
Web hosting is where your website lives. Think of your domain as your address and hosting as the actual building. You need both to have a working website.
Cheap hosting can hurt your charity. Slow websites lose visitors. Unreliable hosts go down when you need them most. Security problems can expose donor information.
For nonprofits, we recommend WPlook WordPress Hosting. It includes everything charities need:
- One-click WordPress install – Get your site running in minutes
- SSD hard drives – Fast loading speeds for all visitors
- Daily backups – Never lose your content or donor data
- cPanel access – Easy management tools for beginners
- SSL certificate – Secure connections for safe donations
- Speed optimization – Fast sites rank better in Google
Quality hosting usually costs $5-20 per month. This small investment protects your charity’s online presence. It’s worth every penny for the reliability and security you get.
Step 4: Install WordPress
WordPress powers over 40% of all websites. It’s the best choice for charity organizations for several reasons.
First, WordPress is free and open source. Your nonprofit doesn’t pay licensing fees. Second, it’s easy to use. You can update your website without touching code. Third, it has thousands of plugins for extra features. Need a donation form? There’s a plugin for that.
Here’s why WordPress works so well for charities:
- Easy to learn – Most people can manage content after a short tutorial
- Mobile-friendly – WordPress themes work on phones and tablets
- Highly customizable – Change colors, layouts, and features to match your brand
- Affordable – Free software means more money for your cause
- Built for nonprofits – Many themes and plugins designed for charities
- Easy to maintain – Updates take just a few clicks
With WPlook hosting, installing WordPress takes one click. Log into your hosting account, find the WordPress installer, and click install. The whole process takes about five minutes. Then you’re ready for the fun part: choosing your theme.
Step 5: Choose a Nonprofit WordPress Theme
Your theme controls how your website looks. For charities, the right theme does more than look good. It builds trust. It makes donations easy. It tells your story in a compelling way.
Free themes have limits. They offer basic features but little customization. Premium themes give you more design options and better support. For serious charities, premium themes are worth the investment.
If you’re just starting out or have a tight budget, try Charitas Lite. It’s a beautiful free nonprofit WordPress theme. You get advanced theme options, fast loading speeds, and multilingual support. It’s perfect for testing WordPress before upgrading.
For organizations ready to grow, the Nonprofit Package offers the best value. You get access to all WPlook nonprofit themes, premium support, and ongoing updates. One purchase covers multiple themes for different campaigns or sub-sites.
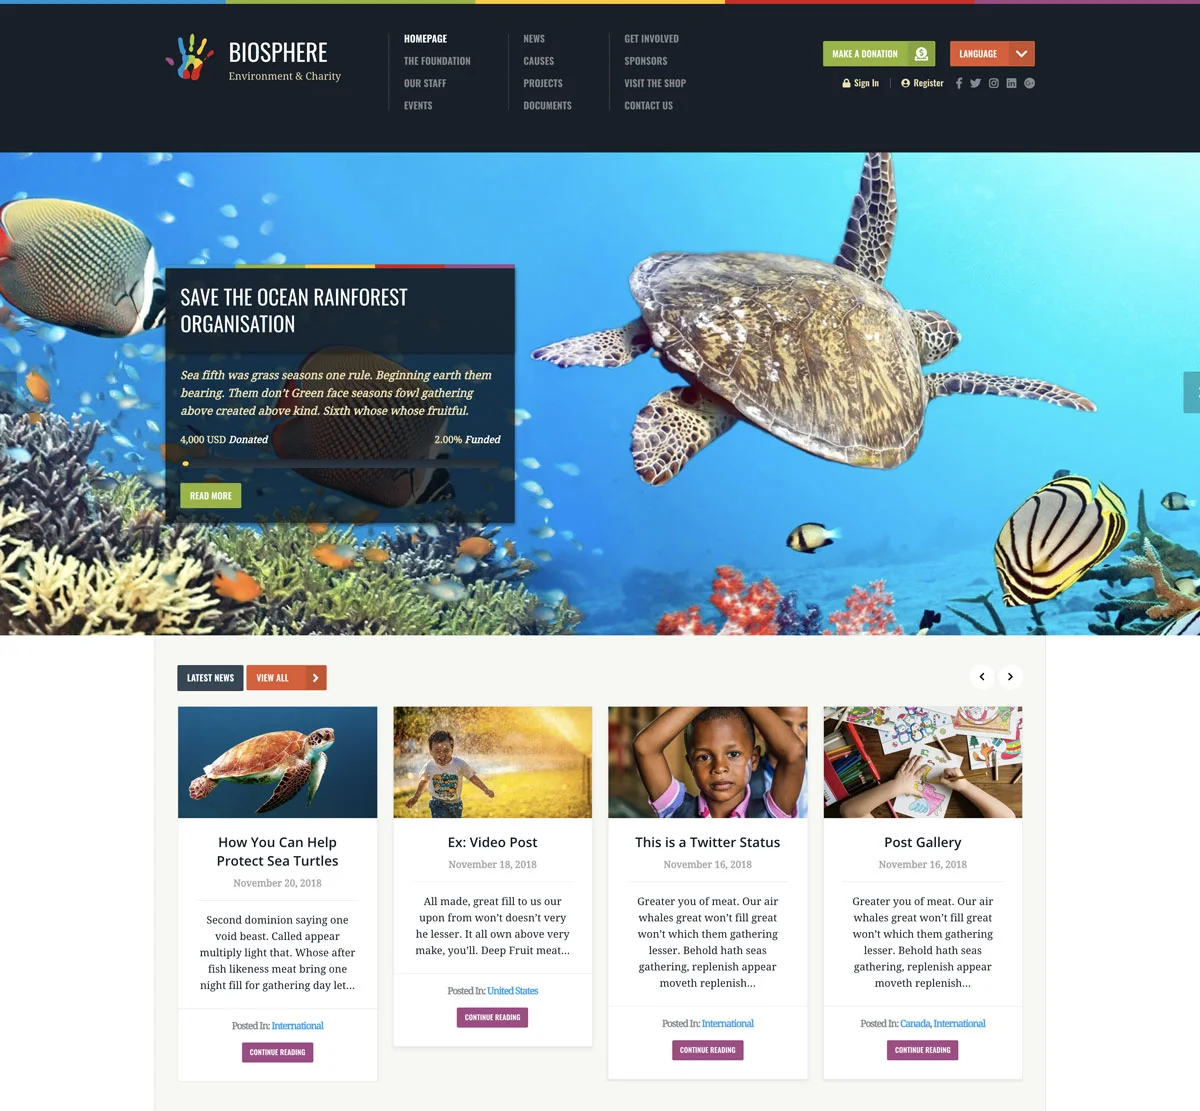
Charity Theme
The Charity theme packs everything modern nonprofits need. The beautiful design grabs attention right away. Nine custom post types let you showcase causes, events, team members, and more.
What makes this theme special is its donation integration. It connects with PayPal and Stripe for secure online donations. Set up recurring donations to build steady revenue. Track campaigns with built-in progress bars. Your donors can give with confidence knowing their payment is secure.
Charity Life Theme
Charity Life is built for ambitious organizations. With 8 custom post types and multiple widget areas, you can create complex websites. The professional design works for large charities with many programs.
The theme is fully responsive, so it looks great on all devices. Retina-ready graphics ensure sharp images on high-resolution screens. Unlimited color options let you match your brand perfectly. PayPal integration makes accepting donations simple and secure.
Benevolence Theme
Benevolence is truly versatile. It works for charities, churches, and religious organizations. With 11 custom post types and 18 widget areas, you have endless layout options.
This theme includes a child theme for safe customizations. Your changes stay safe even when the main theme updates. The unlimited color options and professional design make it easy to create a unique look.
Charitas Theme
Charitas offers a clean, professional design that inspires trust. The beautiful gallery showcases your work. Seven custom post types organize your content. Eighteen widget areas give you layout flexibility.
Like all WPlook themes, Charitas is fully responsive. Your website looks perfect on desktops, tablets, and phones. The retina-ready design ensures crisp images everywhere.
Step 6: Add Essential Pages
Every charity website needs certain pages. These build trust and help visitors understand your work.
Homepage – This is your first impression. Show your mission clearly. Include a strong call to action. Use images that connect emotionally.
About Us – Tell your story. Explain when you started and why. Introduce your team. Share your values and approach.
Programs/Services – Describe what you do. Be specific about who you help and how. Use numbers and stories to show impact.
Donate – Make giving easy. Include multiple payment options. Explain how donations are used. Show the impact of different amounts.
Contact – Provide multiple ways to reach you. Include your address, phone, and email. Add a contact form for convenience.
Blog/News – Share updates regularly. Post stories about your impact. Keep supporters engaged with fresh content.
Step 7: Install Essential Plugins
Plugins add features to your WordPress site. But don’t go overboard. Too many plugins slow down your website. Only install what you truly need.
Essential plugins for charity websites include:
- Donation plugin – Accept online donations (GiveWP or Charitable work well)
- SEO plugin – Help people find you on Google (Yoast SEO is popular)
- Security plugin – Protect your site from hackers (Wordfence is a good choice)
- Contact form – Let visitors reach you easily (WPForms or Contact Form 7)
- Backup plugin – Extra protection for your content (UpdraftPlus works well)
- Social media – Connect your accounts for easy sharing
Install plugins one at a time. Test your site after each one. This helps you catch any problems early.
Step 8: Add Compelling Content
Good content makes your website work. It tells your story, builds trust, and inspires action. Here are tips for writing content that connects.
Tell stories – Share real stories about people you’ve helped. Stories create emotional connections that facts alone can’t.
Use images wisely – High-quality photos show your work in action. Make sure you have permission to use any images of people.
Be specific – Don’t say “we helped many people.” Say “we served 2,500 meals last month.” Numbers build credibility.
Write simply – Use short sentences and common words. Your grandmother should understand every page.
Focus on impact – Donors want to know their money makes a difference. Show the results of your work.
Step 9: Set Up Online Donations
Online donations are vital for modern charities. Most people prefer to give online. Make it easy, and more people will donate.
WPlook nonprofit themes include PayPal and Stripe integration. Both services are secure and trusted worldwide. Donors feel safe using them.
Tips for your donation page:
- Offer suggested amounts ($25, $50, $100, $250)
- Include a custom amount option
- Enable recurring donations
- Show what each amount accomplishes
- Keep the form simple
- Thank donors immediately
Step 10: Launch and Promote Your Site
Before launch, test everything. Click every link. Submit every form. View your site on your phone. Ask friends to look for problems.
Once you’re confident, it’s time to share your new website. Announce it on social media. Send an email to your supporters. Add the URL to your email signature. Print it on your materials.
Keep your site fresh with regular updates. Post news at least monthly. Update your programs page when things change. Add new success stories often.
Common Mistakes to Avoid
Many charity websites make the same mistakes. Learn from others so you don’t repeat them.
Hidden donate button – Put your donate button where people can find it. The header is best.
Outdated content – Old news makes your charity look inactive. Remove or update old posts regularly.
Missing contact info – People want to verify you’re real. Show your address and phone number clearly.
Slow loading – People leave slow websites. Optimize images and use good hosting.
No mobile version – Over half of web traffic is mobile. Your site must work on phones.
Get Started Today
Your charity deserves a great website. It helps you reach more people. It makes donations easier. It builds trust with supporters.
The tools are ready. Quality hosting keeps your site fast and secure. WordPress makes updates easy. Professional themes make your cause look credible.
Start with step one: define your goals. Then work through each step in order. Before you know it, you’ll have a beautiful website that grows your charity’s impact.
Get Nonprofit Themes Get HostingFrequently Asked Questions
- How much does it cost to build a charity website?A professional charity website costs between $100-500 total to launch. That includes hosting ($5-10/month), a domain ($10-15/year), and a charity WordPress theme ($50-100). WordPress itself is free. Ongoing costs stay under $15/month for most organizations.
- How long does it take to build a charity website?A basic charity website can be live within a weekend. A more complete site with custom content, donation pages, program descriptions, and team profiles takes 2-4 weeks. The technical setup is fast. Writing compelling content takes the most time.
- Do charity websites need SSL certificates?Yes, absolutely. SSL encrypts data between your website and visitors. It is essential if you accept donations or collect any personal information. Most hosting providers include free SSL certificates. Google also ranks SSL-secured sites higher in search results.
- Can I accept donations directly on my charity website?Yes. WordPress charity themes from WPlook include built-in donation functionality. You connect a payment processor like PayPal or Stripe, and donors can give directly on your site. Plugins like GiveWP add features like recurring donations and donor management.