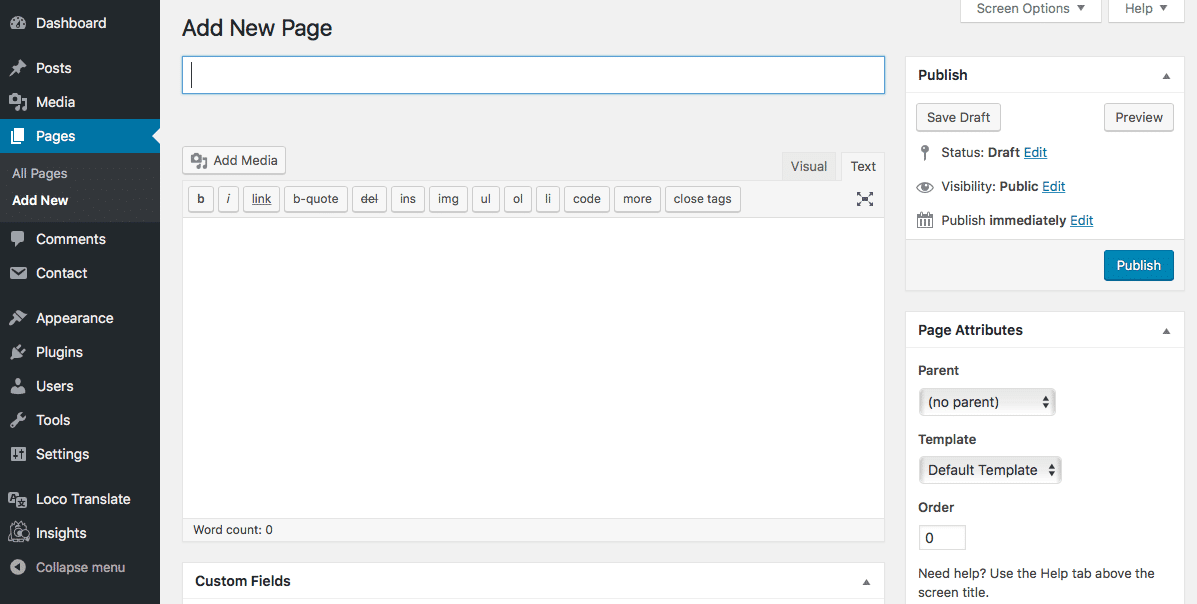
The add new pages screen allows you to add new pages.
Screen Options
There are more editing fields available to you than you see on first login. The Screen Options area allows you to choose which post fields are displayed or hidden from your editing area, which allows you to minimize clutter and customize the page editing screen according to your needs.
You’ll find the Screen Options tab at the very top of your screen, and if you click on it, you’ll see a list of options you can change. Click the Screen Options tab again to close the tab.
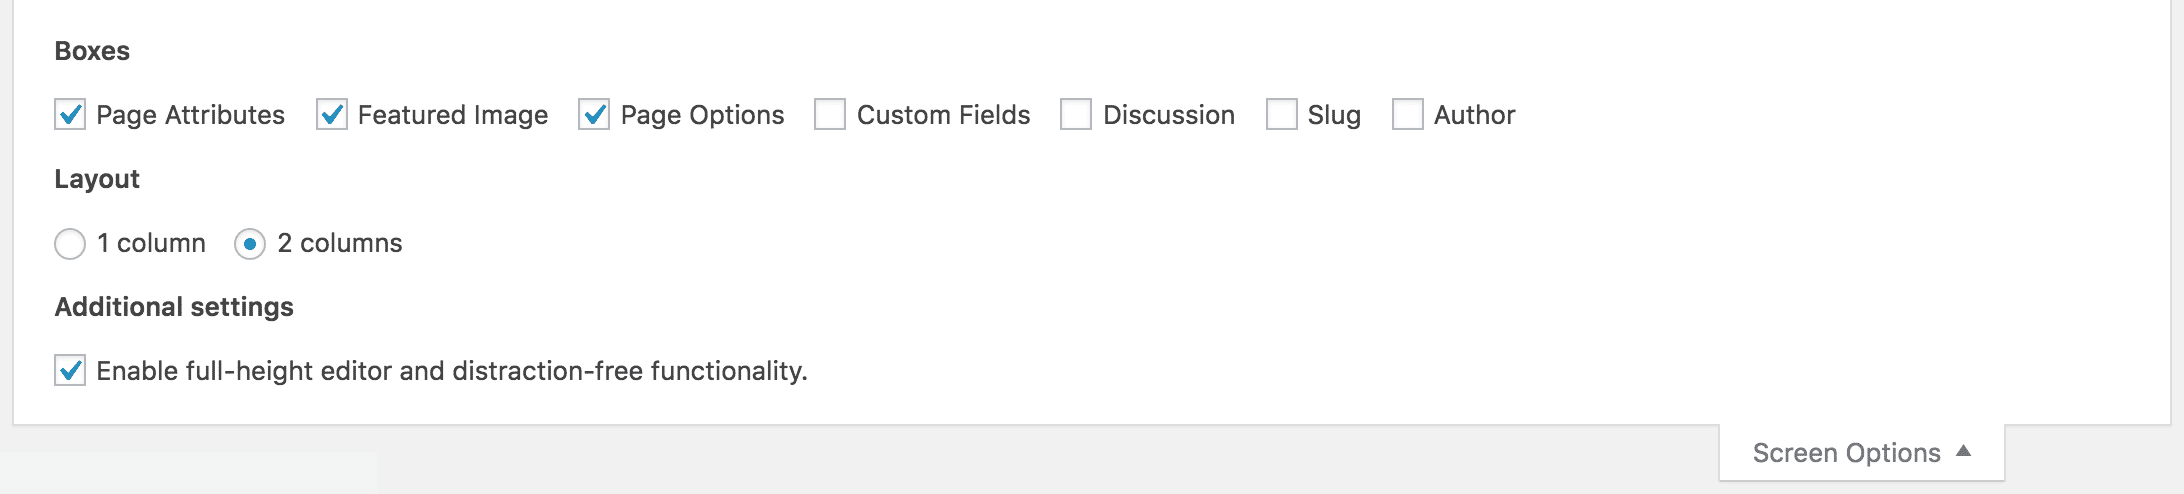
The Boxes section lists what you can change about your pages. If you want to change any of these options, check the box and a box will appear in the page editing area. You can drag these boxes around to create a layout which works for you.
The Layout section controls how many columns are displayed on the screen. Think of it as a main content area and a sidebar. The 2 column layout is the default, with a sidebar, while the 1 column area disables the sidebar and makes the content full width.
The Enable full-height editor and distraction-free functionality option enables the editor which scrolls along with the page, as well as a button in the editor which allows you to go full screen, removing distractions.
Once you’ve customized how your editing screen works, your options are automatically saved. These preferences are saved to your account, so will remain the same even if you change devices, but will not affect the display of the pages table for any other users.
Add New Page
Title
The title of your page. You can use any words or phrases. Avoid using the same title twice as that will cause problems. You can use commas, apostrophes, quotes, hyphens/dashes, and other typical symbols in the page like “About My Site – Here’s Lookin’ at You, Kid.” WordPress will clean it up for the link to the page, called the slug.
Page Editing Area
The blank box where you enter your writing, links, links to images, and any information you want to display on your site. You can use either the visual or the text view to compose your posts.
Preview button
Allows you to view the page before officially publishing it.
Publish box
Contains buttons that control the state of your page. The main states are Published, Pending Review, and Draft. A Published status means the page has been published on your blog for all to see. Pending Review means the draft is waiting for review by an editor prior to publication. Draft means the page has not been published and remains a draft for you. If you select a specific publish status and click the update page or Publish button, that status is applied to the page.
For example, to save a page in the Pending Review status, click edit link of status and select Pending Review from the drop-down box, click OK to close the drop-down box and click Save As Pending button. (You will see all pages organized by status by going to Pages → All Pages).
To schedule a page for publication on a future time or date, click Edit in the publish area next to the words Publish immediately. You can also change the publish date to a date in the past to back-date pages. Change the settings to the desired time and date. You must also click the Publish button when you have completed the page to publish at the desired time and date.
The visibility setting determines how your page appears to the world. Public pages will be visible by all website visitors once published. Password Protected pages are published to all, but visitors must know the password to view the page content. Private pages are visible only to you (and to other editors or admins within your site).
Permalink
After you save your page, the permalink below the title shows the potential URL for the page, as long as you have permalinks enabled. (To enable permalinks, go to Settings → Permalinks.) The URL is generated from your title. In previous versions of WordPress, this was referred to as the “page-slug.” The commas, quotes, apostrophes, and other non-HTML favorable characters are changed and a dash is put between each word. If your title is My Site – Here’s Lookin’ at You, Kid, it will be cleaned up to be my-site-heres-lookin-at-you-kid as the title. You can manually change this, maybe shortening it to my-site-lookin-at-you-kid.
Save
Allows you to save your page as a draft / pending review rather than immediately publishing it. To return to your drafts later, visit Pages → All Pages from dashboard, then click your page title from the list.
Publish
Publishes your page on the site. You can edit the time when the page is published by clicking the Edit link above the Publish button and specifying the time you want the page to be published. By default, at the time the page is first auto-saved, that will be the date and time of the page within the database.
Parent
Parent page controls how deep your page hierarchy goes.
Template
Benevolence uses a range of page templates which allow pages to display lists of custom post types, such as ministries.
Order
Page order to sort the list of pages.