

Want to add Google Tag Manager to WordPress without plugins? This guide shows you how. You will learn to install GTM using simple code in your functions.php file. The process takes just a few minutes and keeps your site fast.
What is Google Tag Manager?
Google Tag Manager (GTM) is a free tool from Google. It helps you manage tracking codes on your website. These codes include Google Analytics, Facebook Pixel, and conversion tracking. Without GTM, you would need to edit your site code each time you add a new tag. This is slow and risky. GTM makes this process simple and safe.
GTM works like a container. You place one piece of code on your site. Then you add all your tags through the GTM dashboard. You can add, edit, or remove tags without touching your website code again. This saves time and reduces errors.
Why Add GTM Without Plugins?
Many WordPress users install plugins for everything. But plugins can slow down your site. Each plugin adds code that your server must load. Too many plugins create security risks too. By adding GTM through your theme’s functions.php file, you keep your site lean and fast.
The code method also gives you full control. Plugin updates can sometimes break things. When you add code manually, you know exactly what runs on your site. This approach works well for developers and site owners who want clean setups.
Before You Start
You need a few things before adding Google Tag Manager to WordPress. First, you need access to your WordPress dashboard. You must be able to edit theme files. Second, you need a Google account. This lets you create a GTM container. Third, you should use a child theme. A child theme protects your changes when you update your main theme.
If you do not have a child theme, you can still add the code. Just know that theme updates will erase your changes. You will need to add the code again after each update. For this reason, using a child theme is the better choice.
Step 1: Create a Google Tag Manager Account
Go to tagmanager.google.com and sign in with your Google account. If you already have a GTM account, you can skip to Step 2. If not, click “Create Account” to start.
Enter your account name. This can be your company name or website name. Choose your country from the dropdown list. You can also choose to share data with Google. This is optional but helps improve the product.
Step 2: Set Up a Container for Your WordPress Site
A container holds all your tags, triggers, and variables. Think of it as a box where all your tracking codes live. Each website needs its own container.
Enter a container name. Use your website URL or a short name you will remember. For the target platform, select “Web” since this is for a WordPress website. Click “Create” to finish. You will need to accept the terms of service.
Step 3: Get Your GTM Container Code
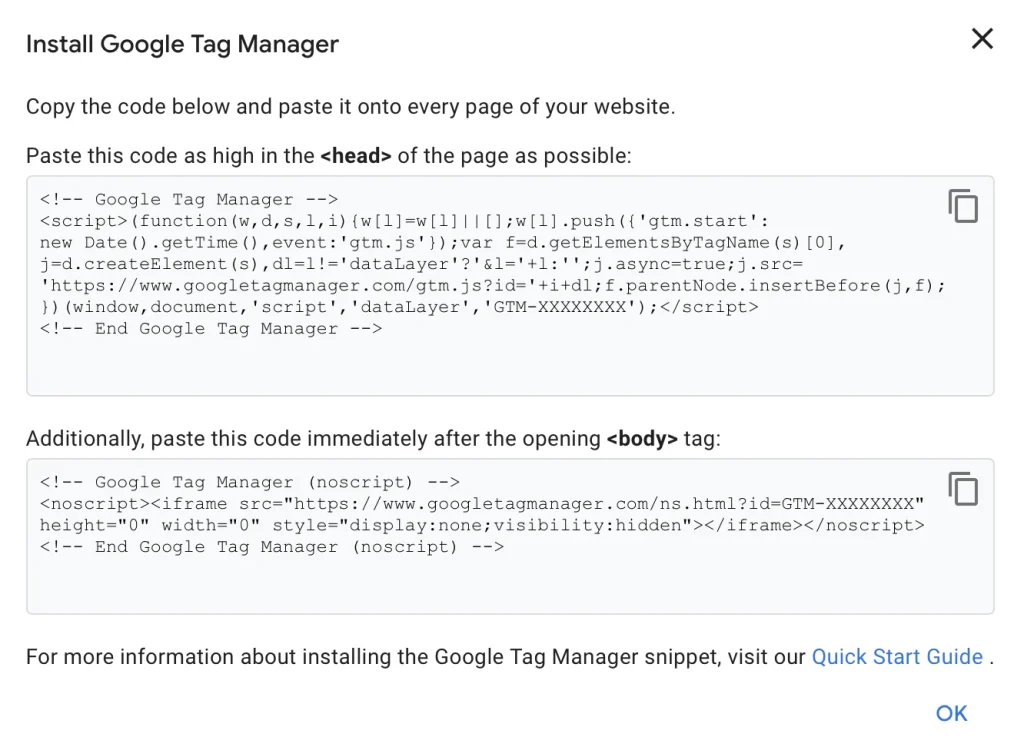
After you create the container, GTM shows you two code snippets. The first goes in your site’s head section. The second goes right after the opening body tag. Do not close this window yet. You will need these codes soon.
You can also find these codes later. Go to the Admin section in GTM. Click on “Install Google Tag Manager” to see them again. Your container ID looks like GTM-XXXXXXXX. Write down this ID or keep the tab open.

Step 4: Add GTM Code to Your functions.php File
Now comes the main step. You will add code to your theme’s functions.php file. This code places the GTM snippets in the right spots on your site.
Log in to your WordPress dashboard. Go to Appearance and then Theme Editor. If you use a child theme, select it from the dropdown. Look for the functions.php file in the list on the right side. Click to open it.
Scroll to the bottom of the file. Add the following code just before the closing tag. Make sure to replace GTM-XXXXXXXX with your actual container ID.
/*-----------------------------------------------------------
Include Google Tag Manager in the header by wplook.com
-----------------------------------------------------------*/
if ( !function_exists( 'wpl_gtm_head_code' ) ) {
function wpl_gtm_head_code(){
?>
<!-- Google Tag Manager -->
<script>(function(w,d,s,l,i){w[l]=w[l]||[];w[l].push({'gtm.start':
new Date().getTime(),event:'gtm.js'});var f=d.getElementsByTagName(s)[0],
j=d.createElement(s),dl=l!='dataLayer'?'&l='+l:'';j.async=true;j.src=
'https://www.googletagmanager.com/gtm.js?id='+i+dl;f.parentNode.insertBefore(j,f);
})(window,document,'script','dataLayer','GTM-XXXXXXXX');</script>
<!-- End Google Tag Manager -->
<?php
}
add_action('wp_head', 'wpl_gtm_head_code');
}

/*-----------------------------------------------------------
Include Google Tag Manager in the body by wplook.com
-----------------------------------------------------------*/
if ( !function_exists( 'wpl_gtm_body_code' ) ) {

function wpl_gtm_body_code() {
?>
<!-- Google Tag Manager (noscript) -->
<noscript><iframe src="https://www.googletagmanager.com/ns.html?id=GTM-XXXXXXXX"
height="0" width="0" style="display:none;visibility:hidden"></iframe></noscript>
<!-- End Google Tag Manager (noscript) -->
<?php
}

add_action( 'wp_body_open', 'wpl_gtm_body_code' );
}
This code does two things. The first function adds the main GTM script to your site’s head section. The second function adds the noscript fallback right after your body tag opens. Both parts are needed for GTM to work well.
Understanding the Code
Let us break down what this code does. The wpl_gtm_head_code function outputs the main GTM JavaScript. This script loads asynchronously. That means it does not block your page from loading. Your site stays fast while GTM does its work in the background.
The wpl_gtm_body_code function adds a backup for users without JavaScript. Some browsers block JavaScript. The noscript iframe ensures these users still get tracked. It loads a simple pixel instead of the full script.
The code uses WordPress hooks. The wp_head hook places content in your site’s head section. The wp_body_open hook places content right after the body tag opens. Most modern themes support both hooks.
Step 5: Save and Test Your Changes
Click the “Update File” button to save your changes. WordPress will confirm that the file was updated. Now you need to test if GTM works on your site.
Go back to Google Tag Manager. Click the “Preview” button in the top right corner. This opens Debug mode. Enter your website URL and click “Connect”. A new tab opens with your website.
If GTM is installed correctly, you will see the Tag Assistant panel at the bottom of your browser. It shows “Tag Manager found” and lists any tags that fired. Close the Debug window when you finish testing.
Adding Your First Tag
Now that GTM is on your site, you can add tags. The most common tag is Google Analytics 4 (GA4). Here is how to add it.
In GTM, click “Tags” in the left menu. Then click “New” to create a tag. Give your tag a name like “GA4 – All Pages”. Click the tag configuration box. Choose “Google Analytics: GA4 Configuration” from the list.
Enter your GA4 Measurement ID. This starts with “G-” and you find it in your Google Analytics property settings. Next, click the triggering box. Choose “All Pages” as your trigger. This makes the tag fire on every page of your site.
Click “Save” to finish. Your tag is now in the workspace but not live yet. Click “Submit” in the top right to publish your changes. Add a version name and description. Click “Publish” to make the tag active.
Common Tags You Can Add
Google Tag Manager supports many types of tags. Here are some popular ones for WordPress sites:
- Google Analytics 4 – Track visitors and their behavior on your site
- Facebook Pixel – Measure ad performance and build audiences
- Google Ads Conversion – Track when visitors complete a goal
- LinkedIn Insight Tag – Track B2B conversions and demographics
- Hotjar – Record user sessions and create heatmaps
- Custom HTML – Add any JavaScript snippet you need
Troubleshooting Common Issues
Sometimes GTM does not work right away. Here are common problems and how to fix them.
GTM not detected: Clear your site cache. Many WordPress sites use caching plugins. These can serve old versions of your pages. Clear the cache and test again.
Code not saving: Your hosting might block file edits. Contact your host to enable theme file editing. You can also use FTP to add the code directly.
Tags not firing: Check your triggers in GTM. Make sure they match the pages where you want tags to fire. Use Preview mode to debug issues.
Theme does not support wp_body_open: Some older themes lack this hook. You can add it manually. Open your theme’s header.php file. Find the opening body tag. Add this code right after it: <?php wp_body_open(); ?>
Best Practices for GTM on WordPress
Follow these tips to get the most from Google Tag Manager on your WordPress site.
Use a child theme: Always add code to a child theme. This protects your work when you update the parent theme. Learn more in our guide on how to make a website.
Name tags clearly: Use a naming system for your tags. Include the type, platform, and purpose. For example: “GA4 – Event – Button Click”.
Test before publishing: Always use Preview mode before you publish. This catches errors before they affect your data.
Create versions: GTM saves versions of your container. Use clear version names and notes. This helps you track changes and roll back if needed.
Limit user access: Only give GTM access to people who need it. Use the built-in permission levels to control what each user can do.
GTM vs WordPress Plugins
You might wonder why you should use this method instead of a plugin. Both work, but they have different benefits.
Plugins are easier for beginners. You install, activate, and enter your ID. No code needed. But plugins add overhead. Each one loads files and runs code. Too many plugins slow your site.
The functions.php method is lighter. You add minimal code that runs fast. You control exactly what happens. There are no extra features you do not use.
For most users, either method works fine. Choose plugins if you do not like editing code. Choose the manual method if you want a lean, fast site.
Frequently Asked Questions
- Is Google Tag Manager free?Yes, Google Tag Manager is completely free. There is no limit on containers, tags, or pageviews. Google offers GTM as a free tool to encourage use of their advertising and analytics products.
- Will GTM slow down my WordPress site?GTM loads asynchronously. This means it does not block your page from loading. The impact on speed is minimal. The tags inside GTM can affect speed, so keep them optimized.
- Can I use GTM and a plugin together?You should not install GTM twice. If you add it via code, do not also use a plugin. Double installation causes tracking errors and data problems.
- What happens if I switch themes?If you added code to your theme and switch themes, GTM will stop working. You need to add the code to your new theme. Using a child theme helps, but you still need to recreate it for the new parent theme.
- Do I still need Google Analytics if I have GTM?Yes. GTM is a container for tags. Google Analytics is a separate product. You use GTM to install the Analytics tag on your site. Both work together.
- Can I track form submissions with GTM?Yes. GTM can track form submissions using triggers. You set up a trigger that fires when a form is submitted. Then you link that trigger to a conversion tag. This works with most WordPress form plugins.
Conclusion
You now know how to add Google Tag Manager to WordPress without plugins. The process is simple. Create a GTM account, get your container ID, and add code to your functions.php file. Test to make sure it works, then add your tags.
This method keeps your site fast and gives you full control. You can manage all your tracking from one place. No more editing site code for each new tag. GTM handles it all for you.
Start using Google Tag Manager today. It will change how you manage your website tracking. For more WordPress tutorials, check our guide on how to set up Google Analytics.
If you are a non-technical user, our support team can help. Order a small job, and we will add GTM to your site in less than 24 hours.